My kids are super excited about December 1st. The reason being they get to start their calendars!
We love advent calendars. The top two have a bible verse and chocolate each day. Braden's has a playmobil pirate calendar each day opens a new toy or accessory for his pirate scene, Brittney has the new littlest pet calendar.
Makes counting down to Christmas lots and lots of fun. We also have one with candy canes in the kitchen, and one with numbers in the living room....Christmas won't get by us we are counting down day by day!
Monday, November 30, 2009
Friday, November 27, 2009
Early early early morning shopping
Up at 1:30 this morning did some online shopping, then headed to WalMart. This was the first year I let Britt go. Really didn't have that much to go after. It was one of the easiest Black Friday's ever for us. But it is a tradition so out we went. People are nuts, I know I am nuts for just going but the real nuts are the ones who were fighting over the $2.00 towels. All in all we got what we went for and it was fun.
Thursday, November 26, 2009
Happy Thanksgiving!
Happy Thanksgiving!
Just a few of the things I am thankful for: my family (especially wonderful husband and kids), good friends, my church, my faith, my home, home schooling, good doctors and therapists that care about Braden, so many more people and things that are in my life and last and not lease Black Friday Sales...Yeah....3am tomorrow!
Thursday, November 19, 2009
Easy sewing craft for Christmas gift
Brittney is just getting into sewing. With that she wants to make everyone something. That can get time consuming and expensive so we came up with fun project that shows everyone that she is thinking of them at Christmas but can be done quickly and not too expensive.
Supplies: Heat protecting quilting pad (I bought a roll of it at Hobby Lobby for$10 and it made approximately 12 potholders this is with using it doubled for more protection and stronger potholders)
Fabric I either purchased 1/4 yard or 1/2 yards of fabric she liked for certain people, or she was able to find some great deals with scraps and remnants on the clearance racks.
First you cut squares out. They can be whatever size you want just remember you are going to sew around them and turn them inside out so it will be smaller than what you originally cut.
You will have 4 squares the sme size (2 of quiltin pad and 2 of fabric)
you place them in order like the picture below quilting pad, fabric, fabric (make sure your good sides are facing each other) and another layer of quilting.
Then sew around the edges going in enough to make sure you capture all 4 layers. Leave about 2 inch gap. Turn it inside out and close up the gap you left. Basically it is done. However Brittney went thru with embrodery floss in the middle, and sides just tieing little nots to add more to hers.
Here is one she made for my cousin who is known in the family for bringing cupcakes to every gathering. She has made 12 of these for Christmas presents and it is easy to put couples names on them as well.
Tuesday, November 17, 2009
Thanksgiving Fun Food
I have posted this before, but I figured I would post it again.
I make a centerpiece with my food for Thanksgiving.
Cornicopia ---- THis is really simplier than it looks and is always a talked about item. Instead of a boring veggie plate...take aluminum foil and shape it to a cornicopia, fill it with balled up aluminum foil so it will keep it's shape. Then spray it with cooking spray and using breadsticks wrap around the foil, bake in the oven on 400 till lightly browned. Let cool fill with fresh veggies and put some dip on the side.
Bread Bowl with dip --- Take a round loaf of bread and hollow out place for dip bowl. Then take a small roll attach with toothpick at front for head. Slice a roll for wings (attach with toothpicks) the feathers are zuchini and yellow squash anf carrots cut in feather shapes, for the waddle I cut a piece of red bell pepper, and raisin eyes.
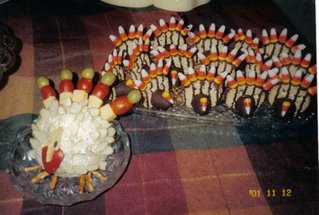
Turkey Cheese Ball - Make my cheese ball as normal, pretzels for the feet, on the back I used pretzel sticks and put on cheese cube, tomato and olive but it might be easier to use long tooth picks or cut down kabob sticks. For the feather appearance half almonds stuck in all over cheeseball, The head is a little trickier you have to cut the craker down and the cut a shape of red bell pepper. I just used black decorating icing for eyes because no one eats that cracker anyway.
Turkey Cookies - I use choc almond bark to attach pieces. I used a almond drop candy for the body (easily found around holidays) attach candy corns to feathers and head.
Subscribe to:
Posts (Atom)